
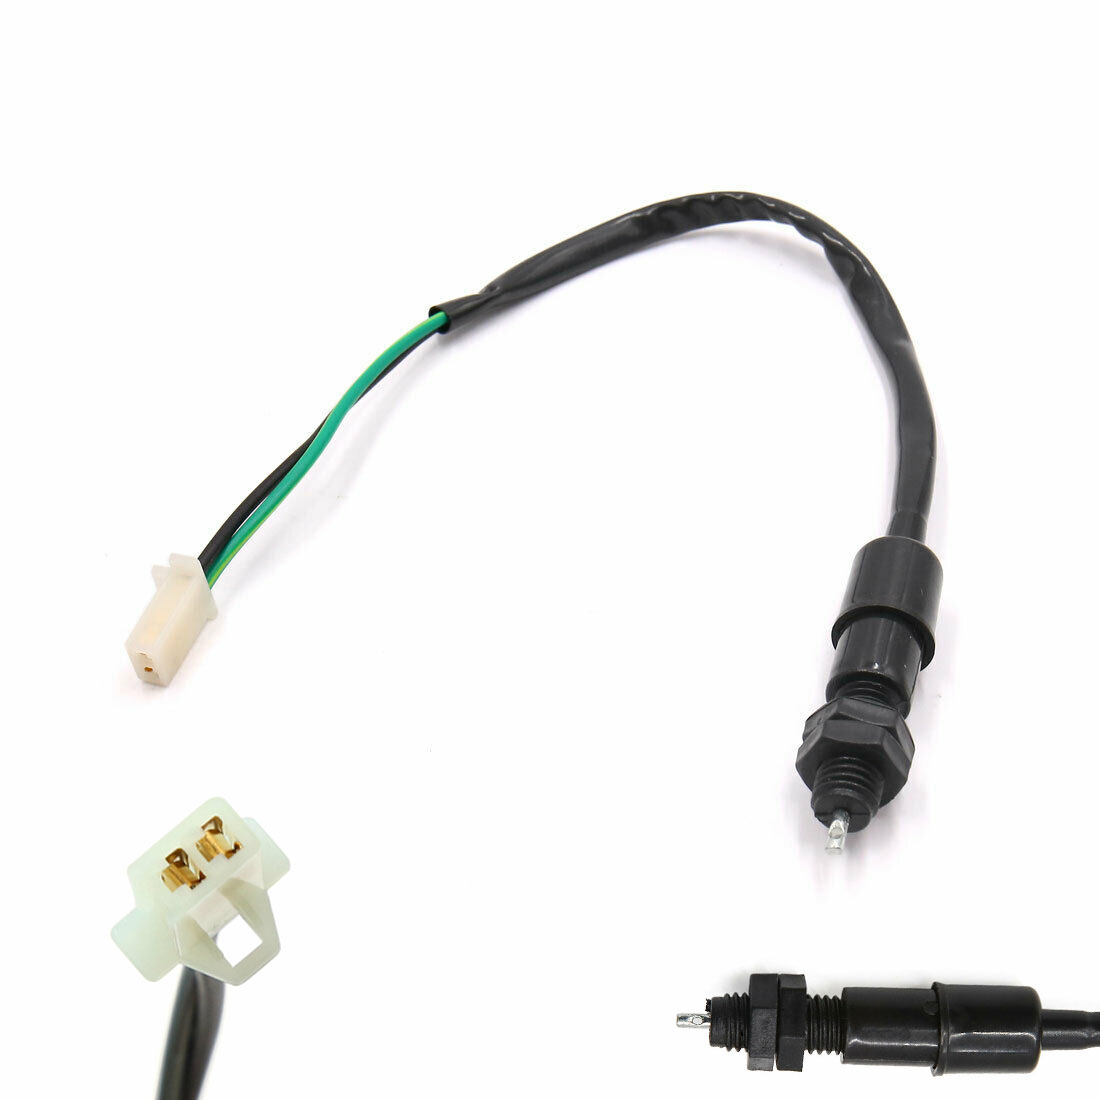
Aftermarket Rear Brake Stop Light Switch – Hyosung GT & GTR Models Only
Restore immediate brake light activation when you stomp the pedal. This reliable part ensures your rear warning light shines bright the split second you slow down, making a new Hyosung rear brake switch the smartest way to stay safe from tailgaters on local roads.
- Safety // Guarantees that cars behind can tell exactly when you press your right foot lever down.
- Wiring // Matches the common white block wire lines for a clean connection straight into your harness loom.
- Models // Tailored specifically to fit unfaired naked frames and sports bike rearsets.
- Supply // In stock in our UK warehouse for fast delivery directly to your home garage door.
♀️ Your wiring must match the female slot in your harness.
❌ The pull spring is NOT supplied in the packet.
Description
Over long miles of riding through bad weather, the tiny electrical points inside your foot pedal sensor naturally wear thin or rust up completely. This slow maintenance reality leads to a twitchy, flickering, or completely dead rear warning lamp. Dealing with a broken sensor is a massive hazard that puts you in danger from cars riding your tail. Sourcing this high-quality aftermarket Hyosung rear brake switch is a vital fix for your bike. Because the factory altered wiring harnesses back and forth across different build years, checking your plastic plugs before buying is absolutely key. This specific unit drops straight onto frames using the standard white plastic socket layout, making your light system completely reliable on local roads.
💎 CHASSIS WIRING HYOSUNG REAR BRAKE SWITCH SPECIFICATIONS
| Tested Aftermarket PartBuilt with durable inner points that handle moisture and wet road salt. | White Two-Pin Plug LinePlugs directly straight into the standard female receiver on the main factory loom. |
| Cures Warning Light FaultsFixes dead or slow stop lamps so you can pass your next annual safety check. | True Factory BlueprintEngineered to mount smoothly in the frame tabs to replace factory code: 37740HN9100. |
📜 Confirmed Fitment Guide
Naked & Faired Sports Groups: Wire lead measurements are verified strictly for the sports chassis layouts noted below. See the diagram picture for location tabs.
- Hyosung GT125 / GT125R Sport: Fits both carb models and injection variations.
- Hyosung GT250 / GT250R Sport: Fits all unfaired and sports fairing variants.
- Hyosung GT650 / GT650R Sport: Fits classic twin setups running standard foot peg plates.
- GV Aquila Series: This wire lead is completely too short to stretch across cruiser frames. It will strictly not fit the GV125, GV250, or any bikes running non-matching round bullet pins.
🔧 Install Tips
- Check Your Plug First: Before you open up the retail packaging bag, take a close look under your frame trim to double-check that your bike’s original plastic socket matches the white block plug shown in our product images. This saves any returns hassle!
- Simple Prong Swap: Make certain your ignition switch key is clicked completely off. Unhook the old weathered line, slide the casing tab out of its frame notch, and push the new aftermarket pin connector firmly into place until it clicks.
- Test Your Warning Lights: Always stand behind your bike and press the rear foot peg lever down hard to verify the stop lens lights up bright before you head out for a ride.
Additional information
| Weight | 0.3 kg |
|---|---|
| Dimensions | 20 × 10 × 2 cm |
You must be logged in to post a review.
GARAGE PICKS // ADD TO BUILD


EXPLORE // RELATED PRODUCTS
-

Heavy Duty Clutch Springs Set [x5] – Hyosung GV125 GT125 GT125R
£19.99 -

Genuine Chrome Engine Oil Filter Cover Cap – GT125R GV125 GV250 GT250 Hyosung
£22.00 -

Braided Air Vacuum Intake Line Hose Kit – Hyosung GV GT 125 & 250 [Carby Models]
£7.99 -

Aftermarket Rear View Mirrors [Round Side] – Hyosung GT125R GT250R GT650R
£25.99
Independent Shop supplying ride enhancements and quality spares with fast dispatch. Need assistance? Access our workshop guides, manuals, tutorials or drop by the forums for troubleshooting help.
Reviews
There are no reviews yet.